In this blog we will walk-through creating Virtual Machine in Microsoft Azure.
Before starting with it, if you are just beginning with Microsoft Azure and haven’t registered with Azure then click on http://azure.microsoft.com/en-us/ to registered yourself and get Microsoft Azure trial for a month.
Once you are done with Azure signup and moving forward to explore Microsoft Azure, then go to https://manage.windowsazure.com/ for Azure Management portal.
So let’s begin with creating Virtual Machine in Azure.
- Click New on the left bottom of the portal i.e. on Command bar.
- Select Compute then select Virtual Machine as we are creating new VM. Here we have two options to create Virtual Machine, wherein
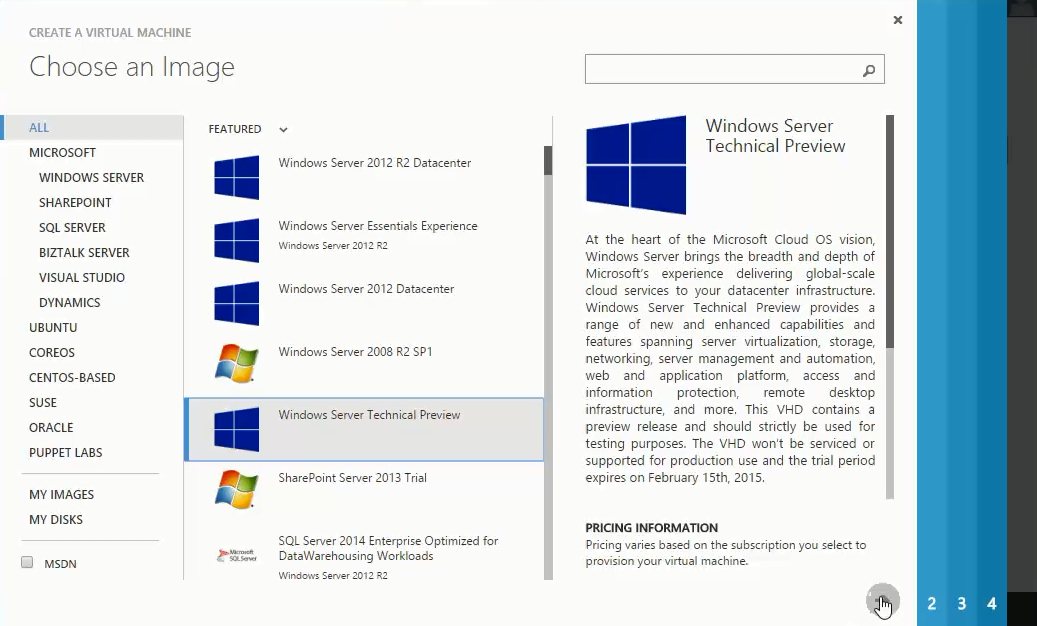
- Choose an image i.e. an Operating System of which you want to create a Virtual Machine from the list of available images. Click arrow to continue.
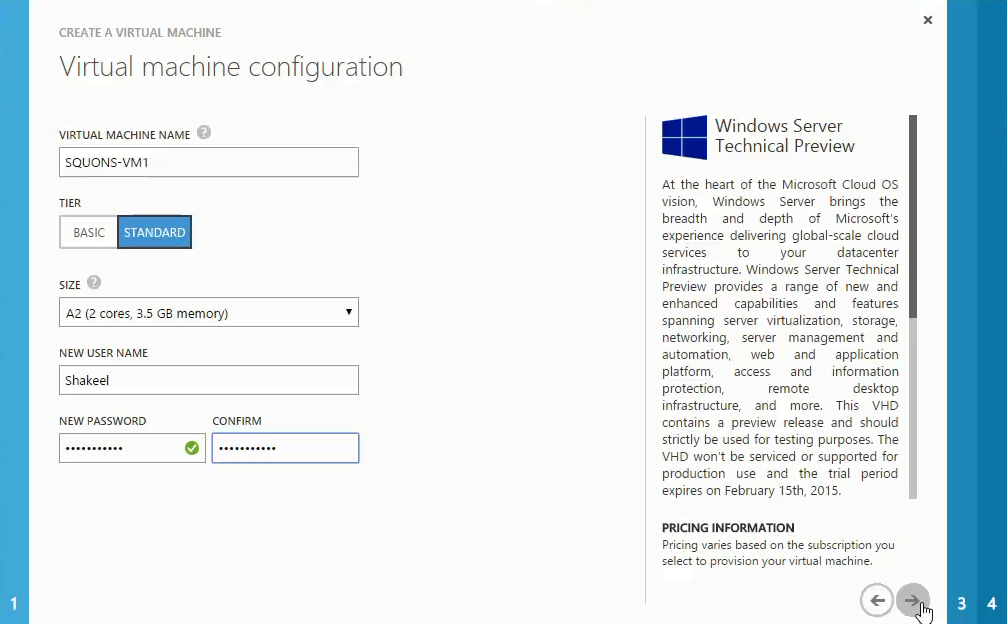
- Now it will ask you to:
- Here you will configure following things:
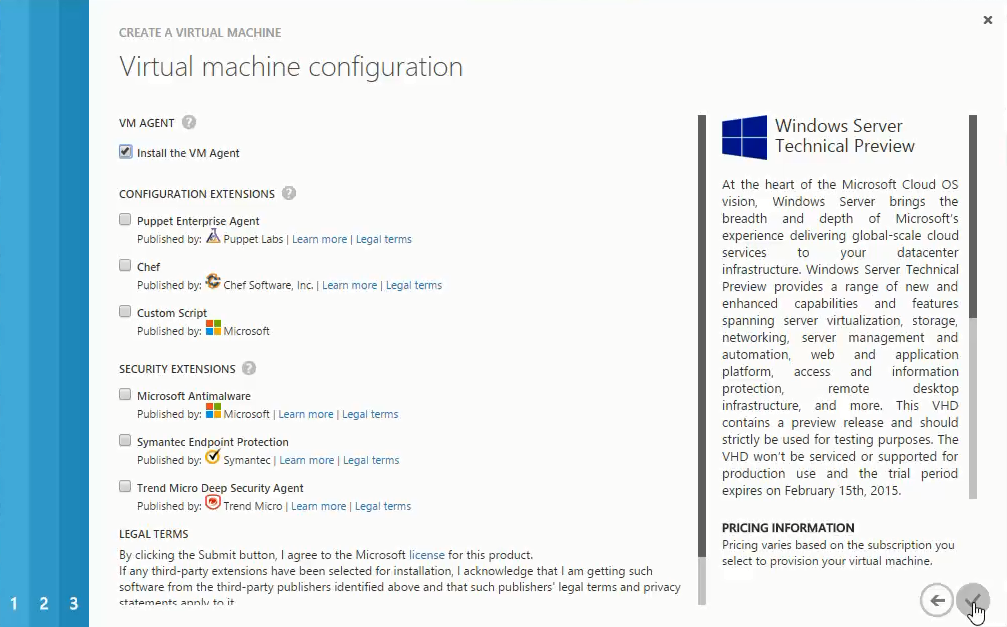
- Here by default Install the VM Agent is checked as it used to install and manage extensions that help you to interact with Virtual Machine and provide Microsoft & Trusted Third Party vendor to enable security, runtime, debugging, management, and other features you can take advantage of to increase your productivity with Azure Virtual Machines.
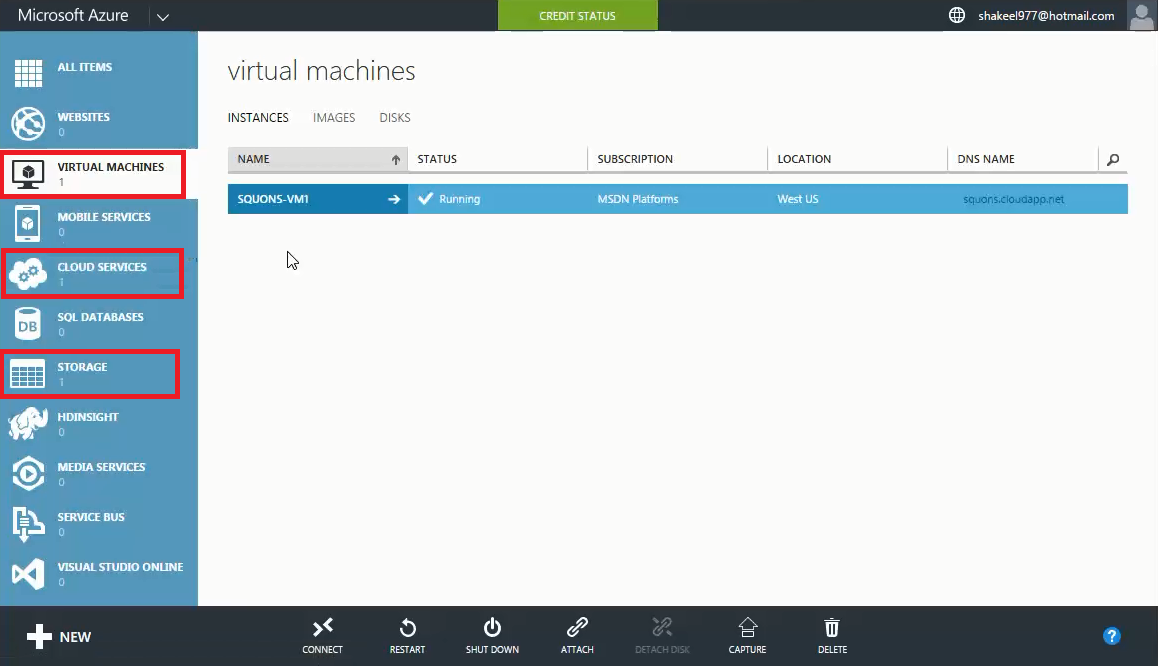
- After the Virtual Machine is created, it is visible on management portal under Virtual Machine moreover you can also see corresponding Storage Account under Storage and Cloud Service under Cloud Service which was created along with Virtual Machine.
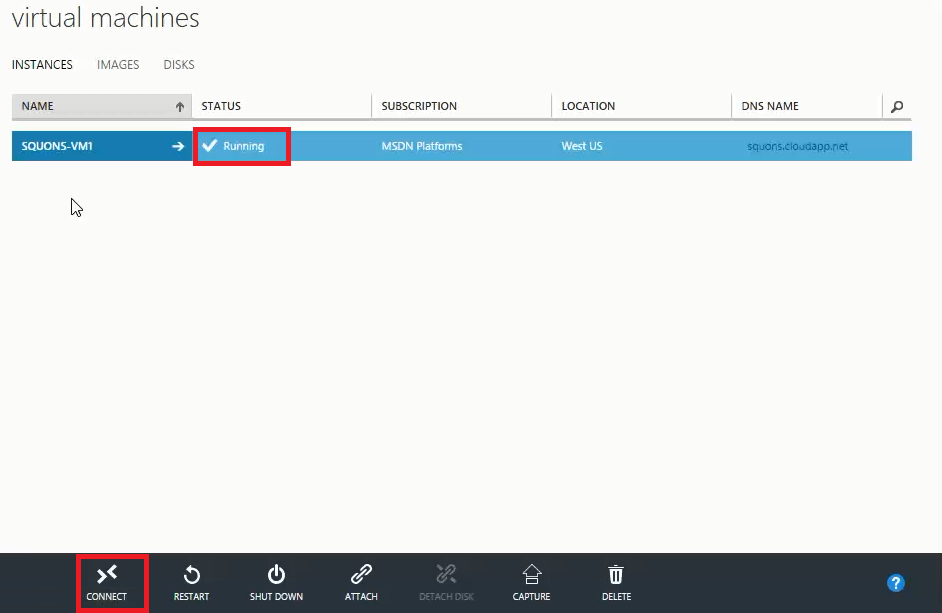
- You can see your Virtual Machine status as Running under Virtual Machine Section and now you can access your Virtual Machine by selecting it from the Virtual Machine list and click Connect which is present on Command Bar.
- It will download a Remote Desktop Protocol file; open that file and click Connect to continue.
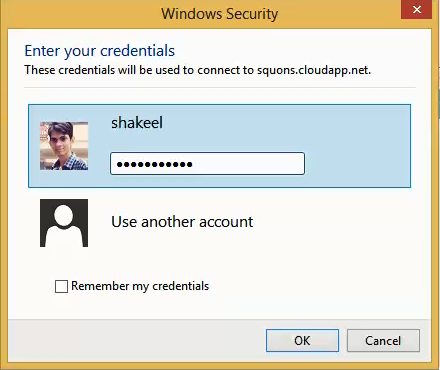
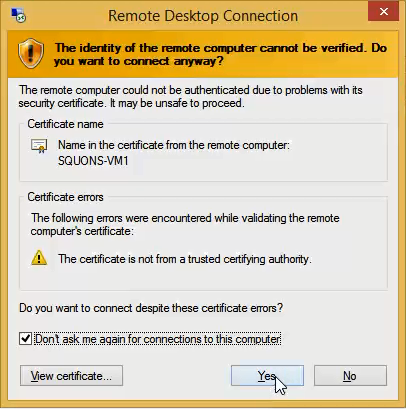
- Enter the Credentials for the administrative account on the virtual machine (as specified in steps no 4), and then click OK. And Click Yes to verify the identity of the virtual machine.
- Ready to work with your Virtual Machine created in Microsoft Azure.
- a. We select From Gallery because it provides the advanced option to create Virtual Machine.
- b. We have Quick Create, which is used to create Virtual Machine instantly as the name depicts without going through the advanced option. We will be having a look at Quick Create option at the end.
- Note: One cannot deploy Virtual Machine in the Virtual Network if he/she is using Quick Create option.
- Further article talks about creating VM using From Gallery, at the end of the blog I have talked about creating VM using Quick Create.
- I will be making a separate blog for Microsoft Azure Virtual Network, so keep posted.

- a. Select the version release date of image you have chosen.
- b. Provide a Virtual Machine Name to your Virtual Machine which will be the hostname for the Virtual Machine.
- c. Select the Size of the Virtual Machine that you want to deploy with the help of drop down option which consist of range of combination of CPU Core and RAM according to your requirement
- d. Provide credential i.e. Username and Password that you will be using to login into the Virtual Machine. Click arrow to continue.
- a. You need to select the Cloud Service. Here you can select existing cloud service or if nothing exists you can leave drop down option as Create a new cloud service and create a new one by mentioning the cloud service name under the Cloud Service DNS Name. In short, it provides a namespace in Azure that leverage VM to be accessed from anywhere and ease to manage/configure/scale/monitor the component deployed on this service.
- b. Select Region/Affinity Group/Virtual Network which defines where (location) you actually want to deploy your virtual machine. Here with the Region, Affinity Group and Virtual Network is associated because whenever Affinity Group or Virtual Network is created that is linked with the region.
- Note: Affinity Group as the name suggests, it leverage us to group Azure services to optimize performance where all services and the Virtual Machines within an affinity group will be located in the same region. Here performance is optimized by placing the physical resources close to each other in the datacenter as possible.
- c. Select the Storage Account which is a secure account that provides access to Azure storage services and unique namespace for your storage resources. Here initially you need to create a fresh storage account later on you can point it to your existing storage account.
- d. Next you can set Availability Set for your Virtual Machine which is used when you are dealing with SLA and need to provide high availability of Virtual Machine even if there is a hardware failure in Microsoft Azure. Moreover it also leverages to scale up & scale down automatically depending upon the demands which grows or shrink and Azure charges only for extra resources that is consumed during peak. This is achieved via load balancing mechanism.
- Select None if you don’t want to set Availability Set.
- e. Then we have Endpoints, for understanding can be considered as a firewall which provides an interface to connect to our Virtual Machine which is deployed on Azure. By default RDP and PowerShell protocol ports are opened so as to access Virtual Machine.
- Click arrow to continue.
Note: Don’t remove the tick from checkbox.
Then we have some Configuration and Security Extensions to provide easy management of Virtual Machine through scripts and manage security capabilities of Virtual Machines by installing Antivirus for Virtual Machine support.
Select Extensions depending upon the requirements and Click Complete to deploy your Virtual Machine in Microsoft Azure.


As promised earlier let’s look at how to create VM using Quick Create option.
Quick Create
To configure Quick Create Virtual Machine follow below snapshot, where you just need to mention the DNS name, Image to be used, Size of Virtual Machine, Credentials and Region/Affinity Group. Click Create A Virtual Machine to deploy your Virtual Machine.
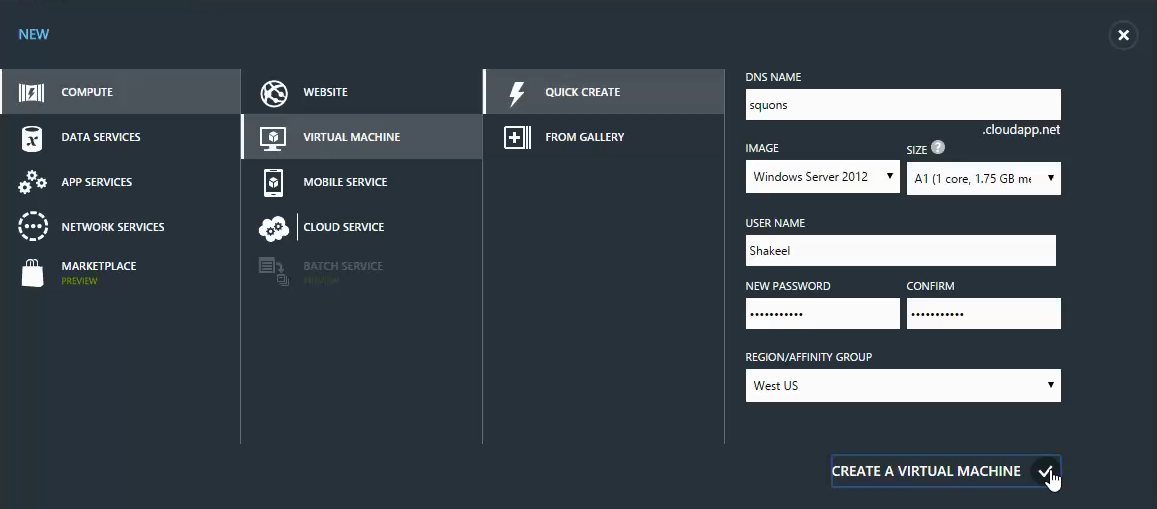
In Quick Create, we cannot use the existing DNS name and also the Virtual Network to deploy the Virtual Machine.
Quick Create
To configure Quick Create Virtual Machine follow below snapshot, where you just need to mention the DNS name, Image to be used, Size of Virtual Machine, Credentials and Region/Affinity Group. Click Create A Virtual Machine to deploy your Virtual Machine.

In Quick Create, we cannot use the existing DNS name and also the Virtual Network to deploy the Virtual Machine.


Your information was very clear. Thank you for sharing.
ReplyDeleteMS Azure Online Training