Saturday 16 July 2016

Speed up Azure Portal Performance

In Azure new portal, It’s been annoying to click on service/content and wait for few seconds to get it loaded and also to traverse from one service link to another.

Most of the guys get frustrated to wait for a while and then interact with the services for their respective task. There has been frequent ask is there any way to improve performance of Azure new portal!!!


Yes. We do have option to turn off those animations which can reduce the lag to load any service/content in Azure portal.

In new portal, go to setting under Animations section select Disable and click Apply button.


Now you are ready to experience the difference after disabling the animation.


Sunday 6 March 2016

Deploying Cisco Adaptive Security Virtual Appliance (ASAv) in Microsoft Azure

This blog provides a walk through to configure Cisco Adaptive Security Virtual Appliance (ASAv) in Microsoft Azure. The Adaptive Security Virtual Appliance is a virtualized network security solution on Microsoft Azure which provide agile security for cloud environments.


Supported Features:

Deployment from Microsoft Azure Cloud
Maximum of four vCPUs per instance
User deployment of L3 networks
Note: Azure does not provide configurable L2 vSwitch capability.
Routed firewall mode (default)
Note: In routed firewall mode the ASAv is a traditional Layer 3 boundary in the network. This mode requires an IP address for each interface. Because Azure does not support VLAN tagged interfaces, the IP addresses must be configured on non-tagged, non-trunk interfaces.

Unsupported Features:

Console access (management is performed using SSH or ASDM over network interfaces)
IPv6
VLAN tagging on user instance interfaces
Jumbo frames
Proxy ARP for an IP address that the device does not own from an Azure perspective
Public IP address on any interface
Only the Management 0/0 interface can have a public IP address associated with it.
Promiscuous mode (no sniffing or transparent mode firewall support)
Note: Azure policy prevents the ASAv from operating in transparent firewall mode because it doesn't allow interfaces to operate in promiscuous mode.
Multi-context mode
Clustering
ASAv native HA
VM import/export
By default, FIPS mode is not enabled on the ASAv running in the Azure cloud.
Caution: If you enable FIPS mode, you must change the Diffie-Helman key exchange group to a stronger key by using the ssh key-exchange group dh-group14-sha1 command. If you don’t change the Diffie-Helman group, you will no longer be able to SSH to the ASAv, and that is the only way to initially manage the ASAv.

To learn more details about Cisco ASAv in Azure:

1. Azure Appliance
https://azure.microsoft.com/en-in/marketplace/partners/cisco/cisco-adaptive-security-appliancecisco-ASAv-four-nic-byol/

2. Cisco ASAv deployment guide
https://www.cisco.com/c/en/us/td/docs/security/asa/asa95/ASAv/quick-start/ASAv-quick/ASAv-azure.pdf


Follow below steps to deploy Cisco ASAv in Azure:

1. If you don’t have Azure subscription, then get one for you (free trial for 30 days)
https://azure.microsoft.com/en-us/free/

2. Login into Azure new portal
https://azure.microsoft.com/en-us/free/

3. On Azure dashboard click on New.


4. In the search box type cisco and it will list you related Cisco appliance, select Cisco ASAv – BYOL 4 NIC.


5. It will open Market place, there select Cisco ASAv – BYOL 4 NIC.


6. It will provide short description about Cisco ASAv, just click on Create.


7. Now, it will ask you to configure ASAv virtual machine.

Basic Setting:


Cisco ASAv setting:

Create Virtual Machine.
Note: Supports only D3 Standard as of now.


Create Storage account, it supports LRS as of now.


Create Public IP address.


Assign DNS Label.


Create VNET,


Configure 4 Subnets (Interfaces):

— Management interface
— Inside interface
— Outside interface
— Additional subnet (DMZ or any network you choose)


Summary of ASAv configuration that will get deployed in Azure. Click OK.


Buy Option:
Terms and Condition for ASAv deployment, Click Create.


8. It will take few minutes to create VM, after it gets deployed click on VM and get the public ip address so as to SSH into VM.


9. If you don’t have any SSH client, then download from below link and run the Putty application.
Enter the Public ip address; select SSH and click Open.
http://www.chiark.greenend.org.uk/~sgtatham/putty/download.html


It will give one warning, click Yes and continue.


10. SSH console will open, then enter your credentials to login into ASAv VM.


Saturday 13 February 2016

Deploying Cisco Cloud Services Router (CSR) 1000V in Microsoft Azure

This blog provides a walk through to configure Cisco Cloud Services Router CSR 1000V in Microsoft Azure. The Cisco Cloud Services Router (CSR) 1000V is a full-featured Cisco IOS XE router, enabling IT departments to deploy enterprise-class networking services in the Azure cloud.


To learn more about Cisco CSR in Azure:

1. Azure Feature
https://azure.microsoft.com/en-in/marketplace/partners/cisco/cisco-csr-basic-templatecsr-azure-byol-two-nic/

2. Cisco CSR 1000V FAQ
http://www.cisco.com/c/en/us/products/collateral/routers/cloud-services-router-1000v-series/qa_c67-729558.html

Follow below steps to deploy Cisco CSR in Azure:

1. If you don’t have Azure subscription, then get one for you (free trial for 30 days)
https://azure.microsoft.com/en-us/free/

2. Login into Azure new portal
https://portal.azure.com

Note: Cisco CSR is available only on Azure new portal (RM-Resource Manager)

3. Go to Virtual Machine section on left hand side and click on Add.


4. It will give you list of available templates from market place, we want to deploy Cisco CSR so just type in search box Cisco and it will display you list of related Cisco cloud appliance.
From listed Cisco appliances select Cisco CSR.


5. It will provide short description about Cisco CSR, just click on Create.


6. Now, it will ask you to configure CSR virtual machine.

Basic Setting:


Cisco CSR setting:
Note: Supports only D2 Standard now and LRS-Storage.


We have to configure 2 subnets, one to connect outside network to internet and second to connect internal infrastructure.

Summary:

CSR configuration that will get deployed in Azure. Click OK.


Buy Option:
Terms and Condition for CSR deployment, Click Create.


7. It will take ample of time to create VM, after it gets deployed click on VM and get the public ip address so as to SSH into VM.


8. If you don’t have any SSH client, then download from below link and run the Putty application.
Enter the Public ip address; select SSH and click Open.
http://www.chiark.greenend.org.uk/~sgtatham/putty/download.html


It will give a warning, click Yes and continue.


9. SSH console will open, then enter your credentials to login into CSR VM.


Friday 18 September 2015

Migrating VM from Amazon AWS to Microsoft Azure using ASR

This blog will guide you step by step to migrate VM from Amazon AWS to Microsoft Azure using ASR (Azure Site Recovery). ASR is a Business Continuity and Disaster Recovery (BCDR) solution from Microsoft which is used to protect company’s on-premise physical/virtual machine by orchestrating the replication/failover process to Azure or secondary on-premise datacenter.


Entire migration process comprises of 4 components:

1. Configuration Server: It coordinates and communicates between Master, Process and Protected Machine and sets up recovery & replication in Azure when failover occurs.

2. Master Server: It receives and retain replicated data from Protected Machine using attached VHD’s created on BLOB storage.

3. Process Server: It receives replication data from Protected machine and optimizes data by caching, compressing & encrypting before sending to Master. It also perform automatic discovery of VM and handles push installation of Mobility Service.

4. Protected Machine: It is the machine which can be physical or virtual on Vmware ESXi, Microsoft Hyper-V and Amazon AWS that is to be protected on Azure.

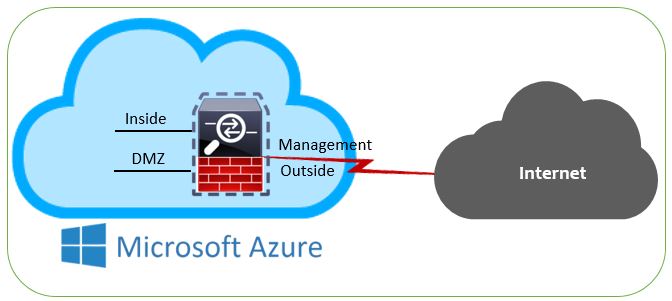
Following picture depicts architectural diagram which is considered for migrating VM from Amazon AWS to Microsoft Azure:


To begin with configuring above mentioned components, first we need to configure Site Recovery Vault.


After creating the Site Recovery Vault click on your Vault name.


It will prompt one window to define your purpose of deploying Site Recovery Vault. Define accordingly and click Ok.


Now let’s begin with configuring components one by one.

I. Configuring Configuration Server

1. On Quick start up page click on Deploy Configuration Server.


2. Fill the details of the Configuration Server and click Ok.


3. It will take some time to deploy Configuration Server as you can see in Job.


4. It automatically creates storage, cloud service, Endpoints and VM of Size Standard A3 with reserved ip configured.


5. Take RDP of Configuration Server VM & you will observe one setup file on desktop which will execute automatically and pops up installer window.
Click Next.


6. Accept Agreement.


7. Enter Password for MySQL which will be installed automatically ahead in the step.


8. Select your current Internet Setting.


9. Select language for error message to be shown in portal.


10. Now it will ask for Azure Site Recovery vault registration key which is available on startup page. Download and copy paste the vault credential key on Configuration Server. Click Install.


11. It will take some time to install and click Finish.


12. One window will open after installation displaying Configuration Server Connection Passphrase, copy and paste it somewhere as it will be used later while establishing connection with Master and Process Server.


13. Next it will display a window which will ask to enter credential that will be used for logging in into Physical/Virtual Machine & deploy Mobility Service. Click Add Account.


14. Enter credentials and click Ok.


II. Configuring Master Server

1. On Quick start up page click on Deploy Master Target Server.


2. Fill the details of the Master Server and click Ok.


3. It will take some time to deploy Master Server as you can see in Job.


4. Master Server VM and endpoints details are as follows:


5. Take the RDP of the server, there you will see Host Agent Config window will be displayed. Here you need to specify details of the Configuration Server and Passphrase. Click Ok to proceed.


I have created 2 instance on Amazon AWS for Process Server and other as machine to be protected.


III. Configuring Process Server

1. On Quick start up page click on Download and install Process Server.


You can download on your machine and then you can copy onto Process Server or copy the download link and download directly on Process Server.


2. The folder consist of 2 application.


3. First install Microsoft-ASR_CX_TP_8.4.0.0_Windows_GA_28Jul2015_release. Click Install.


4. Click Finish after finishing the setup.


5. Next install Microsoft-ASR_CX_8.4.0.0_Windows_GA_28Jul2015_release.
6. Click Next.


7. Select Process Server and click Next.


8. Select No and click Next.


9. Select NIC for Process Server and click Next.


10. Enter details for Configuration Server i.e. its public ip address, endpoint https port and passphrase.


11. Select the installation drive and click Install.


12. It will display warning just ignore and click Yes.


13. Click Finish and the Process Server will get rebooted.


14. To check the Configuration Server setting and its status associated with Master and Process Server, goto ASR > Servers > Configuration Servers and click on configure Configuration Server


IV. Protecting Machine

1. On Quick start up page click on Create Protection Group.


2. Click on Create Protection Group.


3. Mention the Group name, Select the Configuration Server and Target will be by default Microsoft Azure.


4. Specify the Replication setting.


5. Next we need to add the machine which is to be protected. To do so click on configured protection group.


6. Click on Add Physical Machine.


7. Provide the private ip address, friendly name and operating system of machine which is to be protected. Click Next.


8. Now, Select the Process Server, Master Server and Storage Account. Click Next.


9. Select the account which we have created on configuration Server which will be used to deploy Mobility Service on machine which is to be protected. Click Finish.


10. It will take enough time to replicate from Amazon AWS to Microsoft Azure as depicted in Jobs.


After replicating and synchronizing completely go to protected machine and check the details of machine which will look like following snap:


Now to migrate the protected machine from Amazon AWS to Microsoft Azure click on Failover icon present on command bar.


It will prompt one window to confirm the unplanned failover and select the recovery point. Click Finish.


Now after sometime you can see your protected machine running under Virtual Machine on Microsoft Azure.