Monday 11 May 2015

Assigning Static ip address to VM through PowerShell in Azure

We can assign static ip address to VM in Azure through PowerShell and new management portal which was not possible in older Azure management portal.

Static IP address doesn't mean that TCP/IP configuration inside a VM will have "static ip" as ticked mark (no it will be dynamic in TCP/IP configuration), but azure will make sure the VM gets same IP address always.

In this article, we will have a look on how to assign static ip address to VM through PowerShell. Before assigning static ip address to VM, we should first create the Virtual Network and subnet so that we can assign one ip address from Virtual Network Subnet to VM.

Following things to be added while deploying VM via PowerShell so as to assign static ip address to VM from Network Subnet under Virtual Network.

$vnetName = "SQUONS-NETWORK"     # Name of Virtual Network
$subnet = "SQUONS-SUBNET"               # Name of Subnet created under Virtual Network
$staticIP = "192.168.1.10"                         # Static ip to be assigned to VM
New-AzureVMConfig -Name $vmName `
                                      -InstanceSize $size `
                                      -ImageName $imageName |

Add-AzureProvisioningConfig -Windows `
                                                    -AdminUsername $adminUser `
                                                    -Password $password |

Set-AzureStaticVNetIP –IPAddress $staticIP |
               Set-AzureSubnet –SubnetNames $subnet |
                          New-AzureVM -ServiceName $serviceName `
                                                    -Location $location `
                                                   -VNETName $vnetName

As we are assigning static ip address through PowerShell, I have already created Virtual Network in Azure management portal named as “SQUONS-NETWORK” and subnet named as “SQUONS-SUBNET”.


Now, while deploying the VM via PowerShell you get the option to assign static ip address as depicted below:

$adminUser = "Shakeel"
$password = "###########"
$serviceName = "squons"                # ServiceName means CloudService name e.g. “squons”
$location = "West US"                     # In which location you want to deploy your VM e.g. "West US"
$size = "Medium"                                       # Size/Tier name e.g. “Small/Medium/Large” etc
$vmName = "SQUONS-VNET-VM2"                # Name or Virtual Machine e.g. “SQUONS-VM1” 
$imageFamily = "Windows Server 2012 R2 Datacenter"
$vnetName = "SQUONS-NETWORK"                       # Name of Virtual Network
$subnet = "SQUONS-SUBNET"                          # Name of Subnet created under Virtual Network
$staticIP = "192.168.1.10"                         # Static ip to be assigned to VM
$imageName = Get-AzureVMImage |
                                                             where { $_.ImageFamily -eq $imageFamily } |
                                                             sort PublishedDate -Descending |
                                                             select -ExpandProperty ImageName -First 1

New-AzureVMConfig -Name $vmName `
                                      -InstanceSize $size `
                                      -ImageName $imageName |

Add-AzureProvisioningConfig -Windows `
                                                    -AdminUsername $adminUser `
                                                    -Password $password |

Set-AzureStaticVNetIP –IPAddress $staticIP |
 Set-AzureSubnet –SubnetNames $subnet |
  New-AzureVM -ServiceName $serviceName `
                            -Location $location `
                            -VNETName $vnetName


To verify the properties of deployed VM, use the following syntax:

Get-AzureVM –NAME “VM Name” –ServiceName “Cloud Service Name”


Sunday 10 May 2015

Assigning Static ip address to VM in Azure

We can assign static ip address to VM in Azure through new management portal which wasn’t possible in older Azure management portal.

Static IP address doesn't mean that TCP/IP configuration inside a VM will have "static ip" as ticked mark (no it will be dynamic in TCP/IP configuration), but azure will make sure the VM gets same IP address always.

Before assigning static ip address to VM, we should first create the Virtual Network and subnet so that we can assign one ip address from Virtual Network Subnet to VM.

As we are assigning static ip address through new Azure management portal, I have created Virtual Network in new Azure management portal named as “SQUONS-VNET” and subnet named as “SQUONS-SUBNET1”.


Now, while deploying the VM in new Azure management portal you get the option to assign static ip address as depicted below:


Note: We can also assign static ip address to the VM which is already deployed in Virtual Network by going to VM “All settings” as depicted below:


Deploying VM in Virtual Network through PowerShell

I have already posted articles regarding creating VM’s through PowerShell and also came across the step of assigning VM’s to Virtual Network via management portal.

In this article, we will have a look on how to deploy VM in Virtual Network through PowerShell.
Following things to be added while deploying VM via PowerShell so as to ensure VM to be placed within mentioned Network Subnet under Virtual network.

$vnetName = "SQUONS-NETWORK"             # Name of Virtual Network
$subnet = "SQUONS-SUBNET"                       # Name of Subnet created under Virtual Network
New-AzureQuickVM -Windows `
                                     -ServiceName $serviceName `
                                     -Name $vmName `
                                     -ImageName $imageName `
                                     -AdminUsername $adminUser `
                                     -Password $password `
                                     -Location $location `
                                     -InstanceSize $size `
                                     -SubnetNames $subnet `
                                     -VNetName $vnetName

Below example depicts how the VM is deployed in Virtual Network through PowerShell.

$adminUser = "Shakeel"
$password = "##########"
$serviceName = "squons-vnet"                    # ServiceName means CloudService name e.g. “squons”
$location = "West US"                      # In which location you want to deploy your VM e.g. "West US"
$size = "Medium"                                  # Size/Tier name e.g. “Small/Medium/Large” etc
$vmName = "SQUONS-VNET-VM1"                   # Name or Virtual Machine e.g. “SQUONS-VM1”
$imageFamily = "Windows Server 2012 R2 Datacenter"
$vnetName = "SQUONS-NETWORK"                       # Name of Virtual Network
$subnet = "SQUONS-SUBNET"                          # Name of Subnet created under Virtual Network
$imageName = Get-AzureVMImage |
                                                             where { $_.ImageFamily -eq $imageFamily } |
                                                             sort PublishedDate -Descending |
                                                             select -ExpandProperty ImageName -First 1
New-AzureQuickVM -Windows `
                                     -ServiceName $serviceName `
                                     -Name $vmName `
                                     -ImageName $imageName `
                                     -AdminUsername $adminUser `
                                     -Password $password `
                                     -Location $location `
                                     -InstanceSize $size `
                                     -SubnetNames $subnet `
                                     -VNetName $vnetName


To verify the properties of deployed VM, use the following syntax:

Get-AzureVM –NAME “VM Name” –ServiceName “Cloud Service Name


Azure Auto Scaling Virtual Machine

As IT industry is growing day by day, the requirement of an organization is also widening in terms of automating the services that is being delivered to the customer in more efficient and scalable way.
In this blog, we will be having a look on how to auto scale the VM’s residing on Azure depending upon the loads mounting on VM in adhoc manner and how easily VM balances the load by scaling up/down VM.
To demonstrate the same, I have used the following steps:

1. Deployed 5 VM’s under virtual network “SQUONS-NETWORK


2. Make sure all 5 VM’s resides in same cloud service “SQUONS” so that we can add them in availability set so as to achieve high availability.


3. I have created availability set “SQUONS-AS”.


4. Now to configure auto scale feature, go to 'cloud service' under 'scale' tab and click on 'set up schedule times' as depicted below.

Here, I am selecting “Different scale settings for weekdays and weekends” considering the scenario where VM’s load goes on peak during weekends and normal during weekdays.


5. After setting up schedule time, it allows us to edit the scale setting for schedule. Here you will get two options (Weekday/Weekend) for which you can set the scale settings.


6. I have first configured the Weekday scale setting as depicted below, where minimum 1 VM will be running & maximum 5, and when average CPU% increase above 60% then 1 additional VM will get added, whereas when average CPU% decreases below 40% then 1 VM will be removed. This addition/removal of VM depends upon the scale up/down wait time, i.e. after a particular interval of time the VM gets added/removed.


7. Next moving towards configuring Weekend scale setting, I have configured in such a way that minimum 3 VM’s will be running & maximum 5, and when average CPU% increase above 60% then 1 additional VM will get added, whereas when average CPU% decreases below 40% then 1 VM will be removed. This addition/removal of VM depends upon the scale up/down wait time, i.e. after a particular interval of time the VM gets added/removed.


8. After saving the scale setting for schedule, the number of VM’s will settle down to minimum number of VM that has to be functioning on weekday/weekend by removing the VM one by one with every scale up/down wait time.

To test functionally auto scale feature of Microsoft Azure, after settling down the VM I increased the CPU utilization of running VM using “CPU Stress” tool as my scale by metric is CPU so that a VM will be added after scale up wait time.

CPU Stress” is available at http://blogs.msdn.com/b/vijaysk/archive/2012/10/27/tools-to-simulate-cpu-memory-disk-load.aspx


Following picture depict the number of VM's running during weekdays and weekends.


This kind of solution is provided to the customer whose business application and/or services touches the peak consumption during weekday/weekend. It is a cost effective and efficient way to achieve ones requirement without investing for bulk resources for particular period of time and hardly utilize thereafter. As one cannot predict how much hit/load will their application and/or services will get and when, so here we can use auto scaling feature and company needs to pay only for what they have used.


Sunday 3 May 2015

Creating Virtual Network in Azure

Before starting with deploying Virtual Network in Azure, Lets understand what Azure Virtual Network is and why do we need in Azure.

Azure Virtual Network is a network infrastructure which is used to provide connectivity between VM’s and Services residing in same Virtual Network.

In networking term it can be considered as one isolated network imagine like a VLAN but it is more than that.

We implement Virtual Network in Azure to provide:
1. Cross-Premises connectivity/Hybrid solution using Point-to-Site/Site-to-Site connection.

2. Communication between VM’s and Services.

3. Bring your own ip address.

Else, we don’t need Virtual Network to be implemented in Azure.

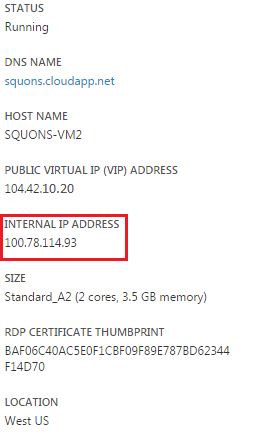
Consider two VM’s named “SQUONS-VM” and “SQUONS-VM2” deployed in Azure without using Virtual network.


Here, both VM can ping each other as they reside in same Cloud Service. But the ip assigned to the VM is through Azure internal DHCP sever randomly and ip changes after every reboot.

So to deploy VM’s on the network, where user defines its own block of addresses to be used by the VM’s such a logical network in Azure is known as Virtual Network.

Virtual Network also allows us to use private address within our internal network defined in RFC 1918.

1. 10.0.0.0 – 10.255.255.255 (10.0.0.0/8)
2. 172.16.0.0 – 172.31.255.255 (172.16.0.0/12)
3. 192.168.0.0 – 192.168.255.255 (192.168.0.0/16)

Recently, Azure also leverages to use any ip address internally apart from the one which is defined in RFC 1918.

Let’s begin with creating Virtual Network in Azure.

Following are the steps to create Virtual Network in Azure from Azure management console:

1. Go to Network section, by scrolling down the components present on left hand in management portal.
Click on “Create a Virtual Network”.


2. Provide a Name to your Virtual Network and select the Location where you want to deploy Virtual Network.

Click .


3. Now under DNS Servers and VPN Connectivity, you can provide default DNS server ip address which VM is going to take after getting deployed in SQUONS-NETWORK and you can also use VPN connectivity such as Point-To-Site, Site-To-Site and ExpressRoute to connect between On-premise and Azure.

Click.

ExpressRoute option is available within the Site-To-Site Connectivity option.

I will be making separate article for Point-To-Site, Site-To-Site and ExpressRoute, so keep posted here.

Meanwhile,

Point-To-Site Connectivity:

It is used to connect individual computer with the Azure Virtual network through VPN Client over SSTP (Secure Socket Tunneling Protocol). It supports up to 128 clients per Azure Virtual Network. It doesn’t need any separate IPSEC VPN device to connect because user is connecting from VPN Client installed on their computer.
Here user needs to login manually whenever he/she needs to perform any kind of administration, testing, development etc.

Site-To-Site Connectivity:

It is used to connect single or multiple site on-premise networks with Azure Virtual through IPSEC VPN device or you can also use software solution such as Microsoft Routing and Remote Access Service.

ExpressRoute:

It is used to provide dedicate/private connectivity between on-premise datacenter or co-located in other datacenter and Microsoft Azure, It’s like extending your infrastructure to Azure. This is achieved with the help of third-party provider such as an Internet Exchange Provider (IXP) or a Network Service Provider (NSP). 
It comes in two models:

a. Exchange Provider Model

Here, the connection is established over BGP (Border Gateway Protocol).

b. Network Service Provider Model

Here, the connection is established over MPLS (Multi Protocol Label Switching).


.
4. Next, you need to define Virtual Network Address Space by creating the network subnets. Network subnet is the block which holds range of ip addresses and is obtained by dividing a huge network into chunks of subnets and every single subnet holds some ip addresses.

VM deployed within created subnet will get the ip address from specified range of address in sequential order.

Here, I have created “SQUONS-SUBNET”

Click  .


5. You can see progress of Virtual Network in Command Bar.


Note: You cannot move existing VM into Virtual Network nor you can move VM from one Virtual Network to another Virtual Network. Under one Virtual Network, we can create multiple Virtual Subnets.

For demonstration, I have created two VM’s named “SQUONS-VM” and “SQUONS-VM2” in Azure Virtual Network “SQUONS-NETWORK” under Virtual Subnet “SQUONS-SUBNET”.


Note: Microsoft Azure reserves 3 ip address excluding subnet id and subnet broadcast address.

For example: In our scenario, I have used Subnet of 192.168.10.0/24 so here 192.168.10.0 (subnet id), 192.168.10.1, 192.168.10.2, 192.168.10.3 and 192.168.10.255(subnet broadcast address) is reserved and cannot be used. Whereas, addresses between 192.168.10.4 – 192.168.10.254 in subnet 192.168.10.0/24 is assigned to the VM sequentially by Azure dynamically.

Hence it is visible above that my 1st VM “SQUONS-VM” is assigned ip address as 192.168.10.4, 2nd VM “SQUONS-VM2” as 192.168.10.5 and it will continue so on.

Here, VM assigned within the subnet can communicate with each other as depicted below:


Note: Disable firewall setting to achieve PING success, as ICMP is blocked by default.

Friday 1 May 2015

Windows Update behavior in Azure

Microsoft is releasing updates or patches frequently for one or other Microsoft products so as to ensure Microsoft products are up to date with the various enhancements and fixes.

Microsoft also recommends to keep Windows update settings to Install updates automatically so that Microsoft product automatically gets updated whenever there is an update for that product. The only concern here is that, machine gets restarted automatically after updating particular product after 2 days.

During that automatic restart, there might be a possibility that users are connected to that machine and some business application is hosted on that. Here, it may affect the business transactions so most of the time in an organization the automatic update is turned off and machines are patched off business hours so that business is not affected by a reboot of machine.

In Microsoft Azure, whenever we deploy VM’s its Windows update setting is set to Install updates automatically as depicted below:


We can turn off Windows update setting while creating VM’s through PowerShell by using following syntax:

Add-AzureProvisioningConfig –DisableAutomaticUpdates [other parameters]


To know more about creating VM's through PowerShell, you can refer to below mentioned link:


After creating the VM, you can verify the Windows update setting as depicted below:


Setting VM Time Zone in Azure

People might have deployed most of the VM’s in Microsoft Azure but did anybody have ever noticed what Time Zone their VM’s belongs to ?

By default every VM’s deployed in Microsoft Azure holds the Time Zone as (UTC) Coordinated Universal Time as depicted below:


Time Zone plays an important role with respect to kind of application and/or services deployed within an infrastructure so to provide consistent synchronous between application and/or services. For example Active Directory, MS SQL etc.

Though we can change the Time Zone after deploying the VM’s but many of time people forget to do so and in future it leads to an additional time investment in troubleshooting which is caused due to Time Zone mismatch.

So here in Microsoft Azure, we can mention the Time Zone while creating VM’s through PowerShell using the following syntax:

Add-AzureProvisioningConfig –TimeZone "Time Zone Name" [Other parameters]

Example: Add-AzureProvisioningConfig –TimeZone "India Standard Time" [Other parameters]


To know more about creating VM's through PowerShell, you can refer to below mentioned link:

http://squons.blogspot.in/2015/03/creating-vm-through-powershell-part-i.html

http://squons.blogspot.in/2015/03/creating-vm-through-powershell-part-ii.html


After creating the VM, you can verify the VM that on which Time Zone it belongs to as depicted below screenshot: