
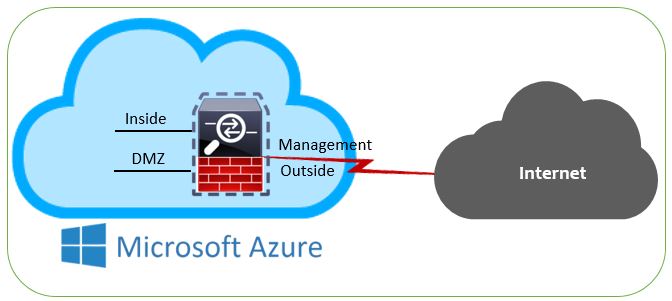
This blog provides a walk through to configure Cisco Adaptive Security Virtual Appliance (ASAv) in Microsoft Azure. The Adaptive Security Virtual Appliance is a virtualized network security solution on Microsoft Azure which provide agile security for cloud environments.

Supported Features:
• Deployment from Microsoft Azure Cloud
• Maximum of four vCPUs per instance
• User deployment of L3 networks
• Note: Azure does not provide configurable L2 vSwitch capability.
• Routed firewall mode (default)
Note: In routed firewall mode the ASAv is a traditional Layer 3 boundary in the network. This mode requires an IP address for each interface. Because Azure does not support VLAN tagged interfaces, the IP addresses must be configured on non-tagged, non-trunk interfaces.
Unsupported Features:
• Console access (management is performed using SSH or ASDM over network interfaces)
• IPv6
• VLAN tagging on user instance interfaces
• Jumbo frames
• Proxy ARP for an IP address that the device does not own from an Azure perspective
• Public IP address on any interface
• Only the Management 0/0 interface can have a public IP address associated with it.
• Promiscuous mode (no sniffing or transparent mode firewall support)
Note: Azure policy prevents the ASAv from operating in transparent firewall mode because it doesn't allow interfaces to operate in promiscuous mode.
• Multi-context mode
• Clustering
• ASAv native HA
• VM import/export
• By default, FIPS mode is not enabled on the ASAv running in the Azure cloud.
Caution: If you enable FIPS mode, you must change the Diffie-Helman key exchange group to a stronger key by using the ssh key-exchange group dh-group14-sha1 command. If you don’t change the Diffie-Helman group, you will no longer be able to SSH to the ASAv, and that is the only way to initially manage the ASAv.
To learn more details about Cisco ASAv in Azure:
1. Azure Appliance
https://azure.microsoft.com/en-in/marketplace/partners/cisco/cisco-adaptive-security-appliancecisco-ASAv-four-nic-byol/
2. Cisco ASAv deployment guide
https://www.cisco.com/c/en/us/td/docs/security/asa/asa95/ASAv/quick-start/ASAv-quick/ASAv-azure.pdf
Follow below steps to deploy Cisco ASAv in Azure:
1. If you don’t have Azure subscription, then get one for you (free trial for 30 days)
https://azure.microsoft.com/en-us/free/
2. Login into Azure new portal
https://azure.microsoft.com/en-us/free/
3. On Azure dashboard click on New.

4. In the search box type cisco and it will list you related Cisco appliance, select Cisco ASAv – BYOL 4 NIC.

5. It will open Market place, there select Cisco ASAv – BYOL 4 NIC.

6. It will provide short description about Cisco ASAv, just click on Create.

7. Now, it will ask you to configure ASAv virtual machine.
Basic Setting:

Cisco ASAv setting:
Create Virtual Machine.
Note: Supports only D3 Standard as of now.

Create Storage account, it supports LRS as of now.

Create Public IP address.

Assign DNS Label.

Create VNET,

Configure 4 Subnets (Interfaces):
— Management interface
— Inside interface
— Outside interface
— Additional subnet (DMZ or any network you choose)

Summary of ASAv configuration that will get deployed in Azure. Click OK.

Buy Option:
Terms and Condition for ASAv deployment, Click Create.

8. It will take few minutes to create VM, after it gets deployed click on VM and get the public ip address so as to SSH into VM.

9. If you don’t have any SSH client, then download from below link and run the Putty application.
Enter the Public ip address; select SSH and click Open.
http://www.chiark.greenend.org.uk/~sgtatham/putty/download.html

It will give one warning, click Yes and continue.

10. SSH console will open, then enter your credentials to login into ASAv VM.
